
The second part of this little series on Improv Quarter Circles is here! A few 5:30 am wake-ups allowed me to finish the binding rather quickly.
Here is the process in which I finished my mini…
Step 1: Sandwich your mini quilt with batting and backing and baste in which ever manner you are comfortable with. I chose to pin-baste because that is what I currently have on hand. Also, audition threads if you have chosen to machine quilt your top. I chose to use the middle thread which happens to be Wonderfil Konfetti Color KT402 (orange). Konfetti is a 50wt thread and works wonderfully for machine quilting.

Step 2: Quilt as desired!!! I desired to quilt using horizontal lines 1/2 inch apart.
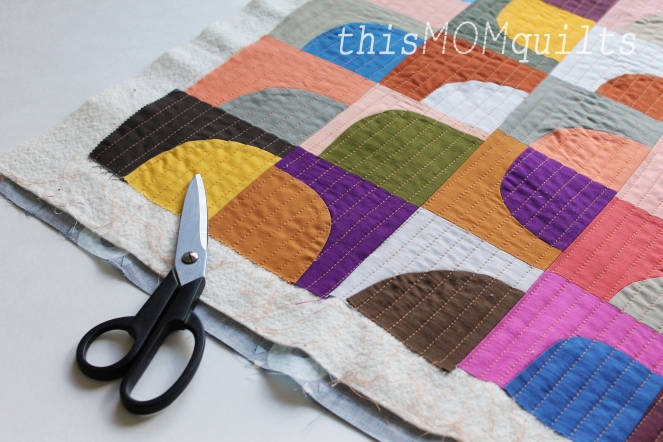
Step 3: Trim excess batting and backing. You may decide to preserve the quilt’s natural wonky edge, or square your quilt traditionally. I chose to maintain the quilt’s natural wonky edge and only trimmed off two corners that were excessively wonky.

Step Four: Next you will want to decide how to bind your mini. I decided that I did not want my quilt top to be contained, so I chose a faced binding. Following a tutorial by The Silly Boo Dilly, below is what resulted. One portion that was quite curvy needed a bit of gathering in order to make the facing fit.


And voila, you have yourself a lovely mini ready for display! Below are some more glamor shots.


Cheers,
Amanda

I love love this quilt!! The non-binding binding is perfect!! Drunkard’s path blocks are my favorite and this makes me wanna try the improv version! Beautiful!
LikeLiked by 1 person
Thank you Pamela! This mini was fun to make and with the video tutorial that Leanne does from She Can Quilt, you will be making perfect curves (wonky or otherwise) in no time. I would like to try this technique again and see what I can come up with. I really like the way the faced binding looks. Thank you!
LikeLiked by 1 person
Love this post about your mini quilt. Your quilt is great, and you gave us a peek at your process and a link to the facing technique that was used.
LikeLike
Thank you Marla for your comment! This mini was fun to make and I think I will explore these improv quarter circles a bit more to see where I can take them.
LikeLike
I have been finishing my own improv quarter circle mini quilt this week. How strange! Your quilt looks amazing and I love the colours and the faced binding. I had never heard of that, and wish I had known about it before I put the binding on mine. Oh well! Now I know, thanks! 🙂
LikeLike
I got the idea out of Sherri Lynn Woods’ book Improv Hnadbook for Modern Quilters, however there are many a good tutorial out there on the internet. I am excited to use the technique again!
Thank you again for your lovely comment!
LikeLiked by 1 person
This is soooooo good! I absolutely love it!
LikeLike
Thank you Sandi! It’s fun to make these fast finished with little ones around! I have much more circle/curve exploration to delve into, eventually! Man I love this community! Celebs cheer you on and it makes me feel so wonderful!!! Thank you again!
LikeLike
I love seeing your creativity at work! I don’t know if it would have ever occurred to me to leave the edges wonky and it looks fantastic. Great quilt…very inspiring!
LikeLike
Thank you Sylvia. I like to go through Sherri Lynn Woods’ book when I need a little boost in creativity. There are lots of quilts in there with wonky edges and I thought I’d give it a try. It was lots of fun and something new for me too!
LikeLike
This turned out beautiful!!!! Well done.
LikeLike
Thank you Ioleen!
LikeLike
wonky and wonderful.
LikeLike
Thanks grandma! Now I have something to put up on the wall.
LikeLike