Finished works...

What I’ve been up to lately…

Hey there! Long time, no see! I’ve had to revise my year-long goal of blogging on a weekly basis down to once a month. So here is what I’ve been up to lately… I finished my Facet+Plus QAL quilt and gifted it…before the baby graduated high school!!! I found out before purchasing backing and binding… Continue reading What I’ve been up to lately…

Facet+Plus QAL

Facet+Plus QAL…the ‘Real Life Edition’ and Giveaway

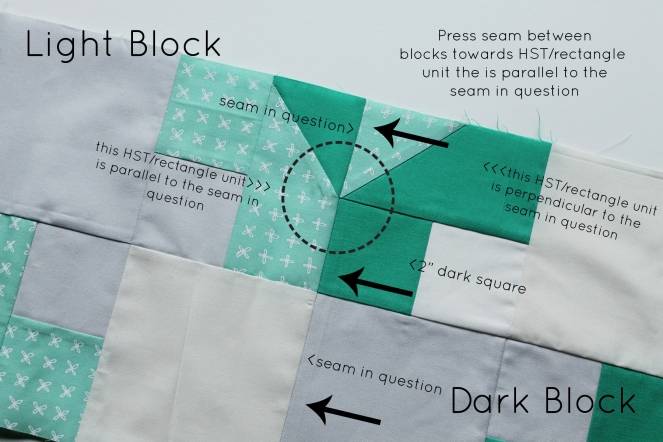
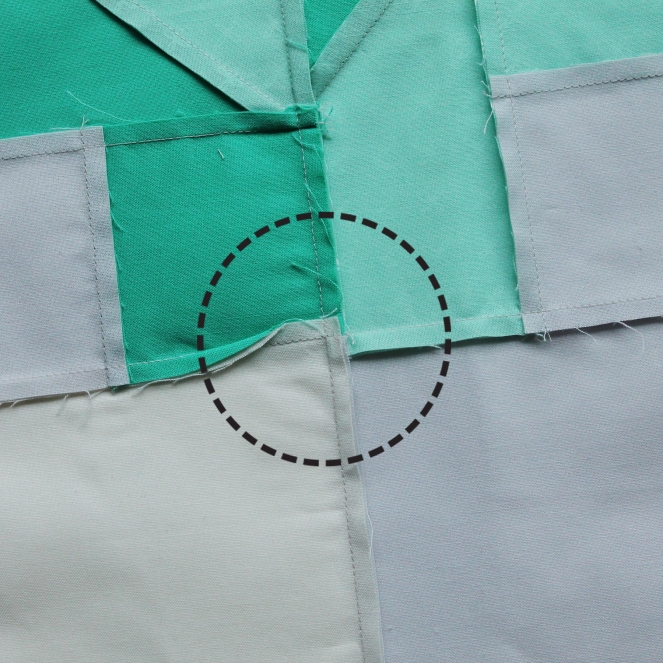
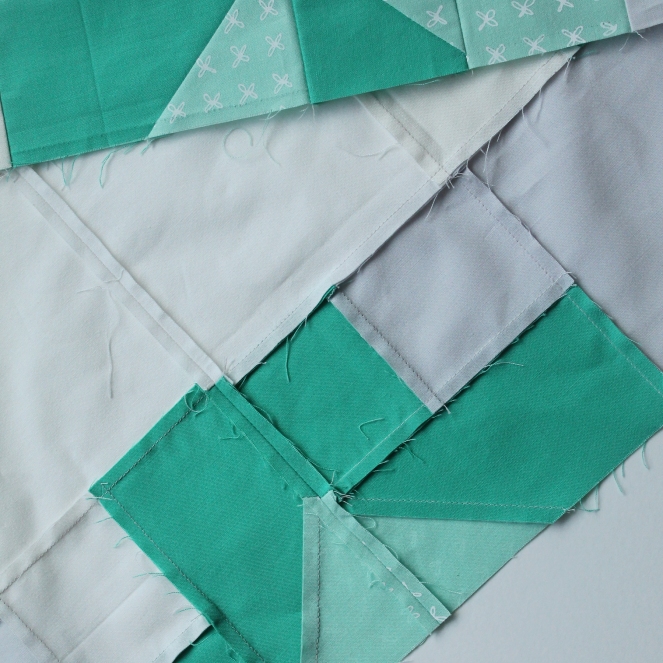
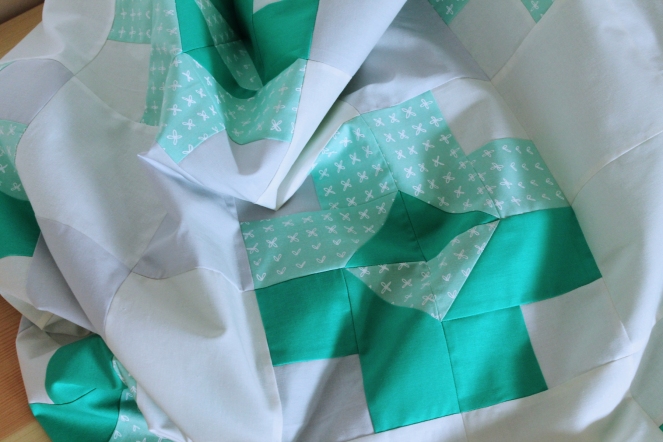
Welcome back everyone for the last post in the Facet+Plus Quilt Along. Did you happen to finish your quilt? No…well me either. That is why I titled this post the ‘Real Life Edition.’ I had big plans to reveal this quilt all quilted and bound, but that did not happen and that is okay! But hey, lets have a giveaway anyway, because progress is progress!

Before I reveal my F+P QAL WIP, lets have a little bit of a blog hop. I am completely honored that these ladies (and a few more that aren’t’ listed) decided to quilt along with me. And each quilter put her own spin on the pattern which is so lovely. Take a few moments, if you would like, to check out their progress and comment on their wonderful work. *I will update the following list on Monday, September 19th 2016 if anyone happens to write a post that day.* **Post links have been updated!**

**Amanda @Gypsy Moon Quilt Co. (all of her fabric is up-cycled and so gorgeous!)

Sharon @Yellow Cat Quilts (with more progress pictures on her Instagram feed)

Sue @Seven Oaks Street Quilts (wow, do I ever love that black background)

**Tami @Sew Much for Free Time (wonderful use of diagonal color)

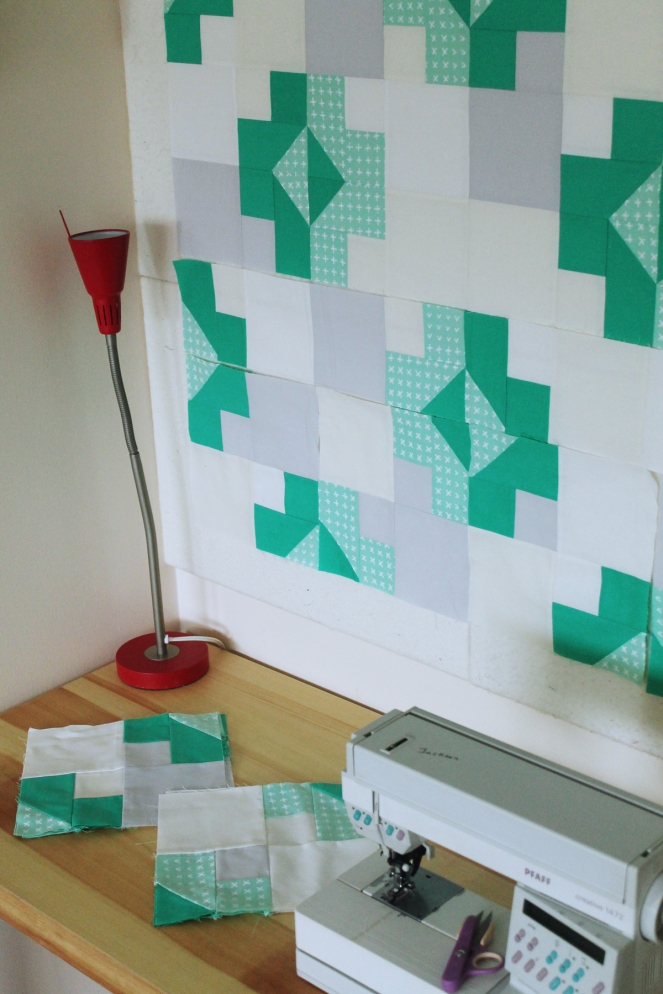
So onto the WIP reveal…

img_3272-edited
I have my quilt sandwiched and spray basted with about 1/5th of the quilting finished. I used Chasing Butterflies by Lizzy House in grape fizz (lighter purple) and it is gorgeous for the backing.
img_3274-edited
I chose to section the quilt into unequal quadrants on the diagonal and then echo each section using lines 1/2″ apart. I was going great guns and then my quilting-jo disappeared along with my free-time.
img_3280-edited
I plan to bind the quilt using Mini-Pearl Bracelets by Lizzy House in grape and am quilting the top using Wonderfil Konfetti Col. KT614 (light purple). Wonderfil Konfetti is my favorite thread to machine quilt quilts on my domestic machine.

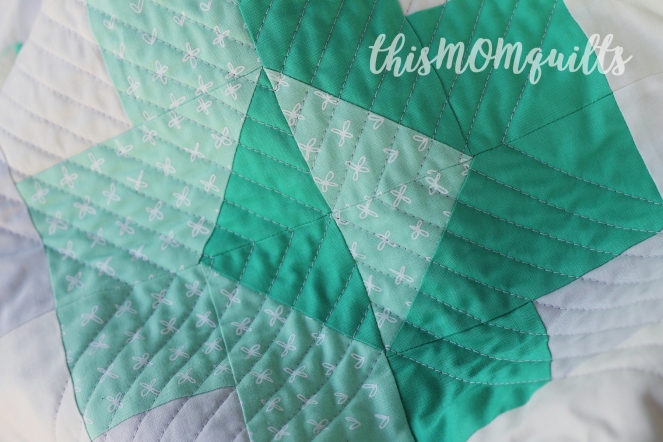
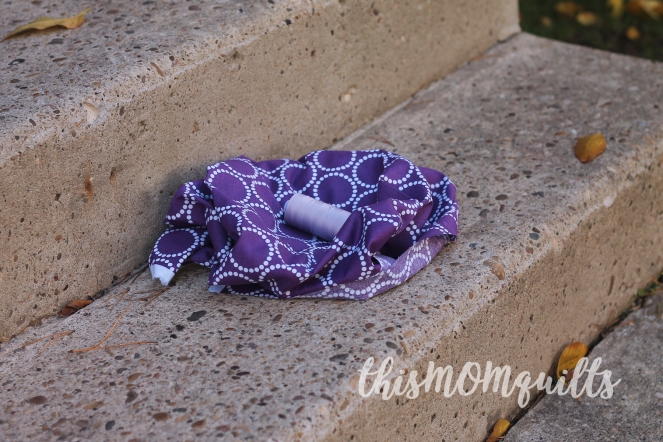
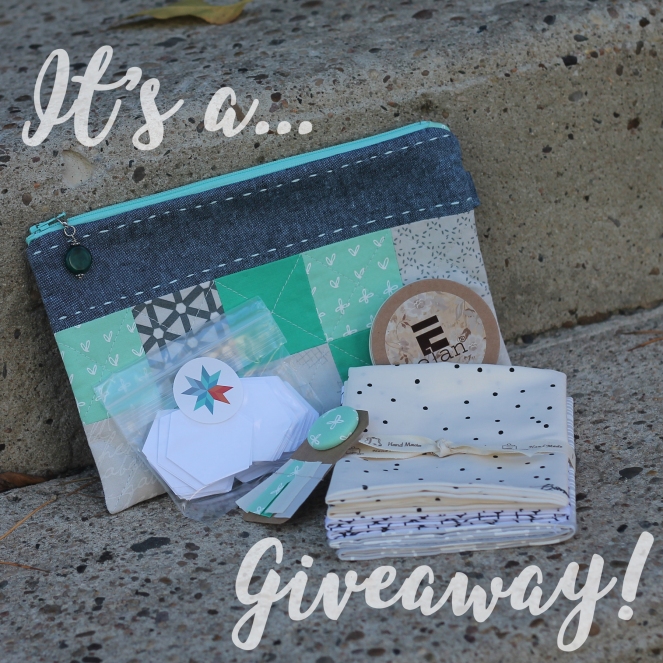
And here it is, the giveaway as promised. You can see that I am a little obsessed with low-volume backgrounds so I wanted to pass on the love. I have also included a few other lovelies as well. All you have to do to enter is leave a comment on this blog post. If you happen to be a no-reply blogger, please leave some way that I can reach you (either email address, Instagram handle or your blog URL). The winner will be chosen Wednesday, September 21st 2016 and announced here!

img_3282-edited

Thank you for joining me on this QAL adventure!

Cheers,

Amanda


Miscellaneous

2016 Cloud9 New Block Blog Hop

2016 New Quilt Bloggers

Welcome to my stop on the 2016 Cloud9 New Block Blog Hop! A gorgeous bundle of  Cloud9 Fabrics Cirrus Solids, curated by Yvonne @Quilting Jet Girl, Cheryl @Meadow Mist Designs and Stephanie @Late Night Quilter was generously sent out by Cloud9 for all of us to play with. And may I say, what a lovely eye for color these gals have!

header image.jpg

Where do you find inspiration? I happened to be fresh out so turned to Logo Modernism by Jens Muller and Julius Wiedemann (Ed.) to see what I could drum-up. Seeming to be on a plus-kick (I hope pluses hold out for a bit longer), I wanted to see this 3-D plus come to life in quilt form. This block is very straight forward and is simply a modified 16-patch, however has lots of graphic impact!

Below is an image of the Berry Harvest palette from which I have chosen 3 of the 5 colors to work with in my block. *I have a confession to make, I mucked up my mailing address and my bundle did not arrive before the blog hop started. The fabrics I used in the image of my finished blog are not the lucious  Cloud9 fabrics but stand-in fabrics for color at best.* Confession over…back to the blog post. To re-create the block in another palette, solid or otherwise, choose a background fabric along with a light and dark value fabric.

2016-Cloud9-Cirrus-Solids-New-Block-Blog-Hop-Color-Palette

Pattern Notes
  • The block pattern is written using a 0.25″ seam allowance.
  • Width of Fabric (WOF) measures 20″, based on the fat quarters we received for this blog hop.
  • The finished block made using this tutorial measures 12″x12″  (12.5″x12.5″ unfinished).
  • Refer to this blog post by Gypsy Moon Quilt Co. for a lovely tutorial on making HSTs (2, 4 and 8 at a time). For this block tutorial, we will make 2 HST units per 4″ square of fabric for a total of 4 HST units.
Fabric Requirements and Cutting Instructions

Fabric Requirement 3-D Plus

Block Illustration

3-D Plus Block.jpg

Block Piecing Instructions

Step 1: Piece the Half Square Triangle (HST) Units

  • Mark 4″ background squares corner to corner
  • Pin the marked squares (right sides together) on top of the 4″ dark color squares
  • Sew 1/4″ seam allowance on either side of marked line
  • Cut on marked line to yield 2 HST units per square
  • Press HST units
  • Trim HST units to 3.5″ square

Step 2: Piece Block Together

  • Layout block according to illustration above
  • Sew squares together in each row
  • Sew rows together

Voila! You’ve got a shinny new block!

3-D Plus Quilt Mock-up Final

To make the Baby Size quilt use the block size (12″x12″ finished) in the tutorial. For the Lap Size Quilt, up-size the block to 15″x15″ finished. And to make the Queen Size Quilt, use humongous blocks that finish at 24″x24″. Click here for a fun coloring page!

All of the quilt blocks being made by the bloggers for this New Block Hop are being sent to host Cheryl @Meadow Mist Designs to be assembled into charity quilts! Check out the other bloggers below to see the lovely blocks they have designed.

*Permalinks have been update September 9th, 2016*

Host: Yvonne @Quilting Jetgirl
Abigail @Cut & Alter
Janice @Color, Creating, and Quilting!
Lorinda @Laurel, Poppy, and Pine
Melva @Melva Loves Scraps
Renee @Quilts of a Feather
Kathryn @Upitis Quilts
Kim @Leland Ave Studios
Amanda @this mom quilts
Holly @Lighthouse Lane Designs
Irene @Patchwork and Pastry
Jennifer @Dizzy Quilter
Karen @Tu-Na Quilts, Travels, and Eats
Anne @Said With Love
Suzy @Adventurous Applique and Quilting
Sharla @Thistle Thicket Studio
Kathleen @Smiles From Kate
Amanda @Gypsy Moon Quilt Co.
Sarah @Sarah Goer Quilts
Chelsea @Patch the Giraffe
Jinger @Trials of a Newbie Quilter
Anja @Anja Quilts
Daisy @Ants to Sugar

Enjoy hopping around!

Cheers,

Amanda

Facet+Plus QAL

F+P QAL Piecing the Quilt Top

Well here we are, ready to assemble your quilt top? Confident sewists can proceed how ever they would like, if you want a bit more direction then read-on!

Step 1: Block Layout

Layout your blocks according to your diagram. Match up the seams as best you can while laying out your quilt top. Check out this tutorial for a refresher on matching (butting-up) seams. Most of the seams do butt-up, although some do not and I will show you further down how I handled mismatched seams. If you happened to press all of your seams open, then no seam-matching is required.

IMG_3212 edited

Step 2: Sew Blocks Together into Rows

Pin (if that is your jam) and start sewing your blocks together in rows.

IMG_3221 edited

Step 3: Press Seams

Press seams according to the illustration below. The seam at this particular intersection (shown inside the dashed-circle and occurs between each block) can become quite bulky when that one little horizontal seam is folded back on itself (if the seam just sewn was pressed towards the 2″ dark square). My suggestion is to press this seam towards the half square triangle unit with the rectangle parallel to the seam (indicated by the large black arrows) as opposed to the HST/rectangle unit perpendicular to the seam. If you press each row in this manner, the intersecting block seams will butt-up.

press block.jpg

Step 4: Sew Rows Together

Sew your rows together. All of the intersecting block seams should butt-up as well as the HST seams. Most of the other seams will butt-up as well, but if they don’t you can fudge things a bit. See that business inside the dashed-circle, I just folded the seam over so that things would butt-up and kept on a-sewing. I pressed the seam afterwards and things worked out just fine!

IMG_3224 edited.jpg

Step 5: Press Horizontal Seams

Press the horizontal seams open. You can check out this tutorial on how to press seams open without burning your fingers. The problem with bulky seams resurfaces in this step and unfortunately cannot be avoided by pressing like we did in Step 3. My best defense is to press the horizontal seams open to reduce that bulk. You could take a hammer to the really bulky seams (if you didn’t want to press them open) and hammer out the bulk. Its a real thing, google it if you want.

IMG_3227edited.jpg

And look at that, a flimsy is born! Often this is where my quilt progress stalls out, but I have big plans for this little top and better get crackin’ (well, when the backing and binding shows up).

IMG_3226 edited

Is anyone interested in doing a bit of a quilt reveal/blog hop on September 12th? Oh my gosh, that is the Cloud9 New Block Hop, maybe I will extend things to the week after (September 19th, 2016).  Leave me a comment and I will link to your blog on the 19th. If there are no takers then join me on the 19th for my ‘hopefully’ finished quilt reveal and giveaway goodies! I mean, there WILL be a giveaway either way!

Happy sewing!

Cheers,

Amanda

Facet+Plus QAL

F+P Block Piecing Part 2

Welcome back to the next installment of QAL instructions. How are things coming along? The progress shots I have seen thus far are fantastic!

This week’s sewing instructions are the same as last week but we will be sewing the light color fabric blocks this time around. Click here to review the sewing instructions if you would like. If you are making the Baby Size Quilt, you will piece the same amount of blocks as you did for the dark color fabric. If you are making the Lap Size Quilt you will piece less blocks.

Click on the quilt size below for a handy-dandy cheat sheet with required amounts of units and blocks to make for each quilt size.

*Baby Size Quilt
*Lap Size Quilt

*The colors in the handy-dandy cheat sheet do not represent the color of fabric used to piece each unit. But rather groups the pieces together that are needed to make up each unit.

Below is an illustration of the light color fabric block we will be piecing.

Facet + Plus Block Light

Here is a quick progress shot of the blocks I made. Not all of the blocks are included because I didn’t follow the instructions for the rest ;p.

IMG_3207 edited.jpg

Happy piecing.

Cheers,

Amanda

Facet+Plus QAL

F+P QAL Block Piecing Part 1

Welcome back! Wow, wow, wow is all I can say!!! Y’all picked the most gorgeous fabric for your projects.

This week we will piece together a portion of the blocks using what you have chosen as the dark color fabric. For the Baby Size quilt, you will piece 10 blocks and for the Lap Size quilt you will piece 18 blocks. Click on the quilt size below  for a handy-dandy cheat sheet with required amounts of units and blocks to make for each quilt size.

*Baby Size Quilt
*Lap Size Quilt


*The colors in the handy-dandy cheat sheet do not represent the color of fabric used to piece each unit. But rather groups the pieces together that are needed to make up each unit.

Below is the block we will be piecing today.

IMG_3186edited.jpg

You may use a chain-piecing method to speed up piecing the blocks. Here is a tutorial on how to chain-piece if you have not done so before. You can also search chain-piecing in YouTube to watch a video tutorial. Also, use a 1/4″ seam allowance to piece the blocks and the blocks will measure 10.5″ unfinished (10″ finished).

Step 1: Piece the 3″ Square Units

Using the chain-piecing method, piece the 3″ square dark color fabric squares to the 3″ background fabric squares. Refer to the handy-dandy cheat sheet for total amount of 3″ Square Units to make for the quilt size you have chosen. Press seam towards the darker fabric.

IMG_3178editedIMG_3179edited

Step 2: Piece the Half-Square Triangle (HST) Units

Mark the required number of 3″ light color fabric squares corner-to-corner to prepare them for chain-piecing. Pin the 3″ light color fabric squares to the 3″x5.5″ dark color fabric rectangles; keep in mind that all of the diagonal sew-lines must run the same way to make the facet in the middle of the plus.

IMG_3180edited

Next, sew right on top of the line you have marked on the 3″ light color fabric square. Trim the seam allowance to 1/4″. Use those extra triangle ‘ears’ as a leader-ender project if you desire (reduce waste!).

IMG_3181edited

Press your seams as I have done below. Press half of the HST Units you just created so that the seam points towards the dark color rectangle and the other half of the HST Units so that the seam points towards the light color triangle.

IMG_3182edited

Step 3: Piece the Corner Units

*The Corner Units are not detailed in the handy-dandy cheat sheet.

Piece the 3″ square units to the HST Units. Press the seam towards the HST Unit.

Layout each block, one on top of another, with the HST seams following the arrows in the diagram.

IMG_3184edited.jpg

Step 4: Piece the Block Together

Piece the Corner Units to the 5.5″ background fabric squares. Press the seam towards the 5.5″ background fabric.

IMG_3185edited

Piece the top half of the block to the bottom half of the block. Press the seam towards the bottom half of the block. It really doesn’t matter if you press this seam towards the top half or bottom half of the block, as long as you press this seam the same way for all of these blocks.

IMG_3186edited

Tah dah, all done for the first half of block piecing. And you may have guessed it, the piecing for the other portion of the blocks is exactly the same except for swapping out the dark and light fabrics and making a few less blocks for the Lap Size quilt.

Cheers,

Amanda